How To Install Cane Webbing and Reed Spline in a Chair

- Measure your chair seat or cabinet opening to determine the size of cane webbing you’ll need for your project.
- Clean out all excess material from your chair or cabinet groove, including glue, old spline, splinters, and cane pieces.
- Cut Your cane webbing, or get it ready for use if you bought a piece cut to size.
- Soak your cane webbing in water for about 3 hours.
- The spline should be soaked for about 15 minutes.
- Install your cane webbing wet using wedges.
- Clamp the spline to the table and let it dry.
- Glue spline using non-acrylic clear drying glue to hold the cane webbing in place.
- Trim any excess pieces with caning nippers.
Instructions Written By Caryl DeFrancesco, Co-Owner of HH Perkins
How to remove spline from a groove.

Put masking tape along the outer edge of the spline, around the entire perimeter of the wood. Use a sharp utility blade to score/cut between the area where the outer edge of the spline and wood meet. Cut the entire perimeter to break the seal between the wood of the chair and the spline. Be extremely careful not to scratch or damage the wood of the chair. Start 6” from the corner of your chair seat when removing excess material from your groove.

Use your angled spline remover chisel and a hammer to dig the spline out of the groove. Never start chiseling the spline from the corner. Sometimes, the piece of spline will pop out easily. Apply De-Glue Goo in the groove for a piece of spline that is not lifting. Let the vinegar in the channel soak for an hour, and then use your chisel to scrape out all the spline and glue. Dry the groove with a rag.

Use sandpaper to clean the groove and make it straight along the outer and inner edges. If the groove is jagged, it will not look right once the spline is installed. The Spline will be bumpy and not flush throughout the groove. Remember, glue can’t stick to other glues, and therefore, the groove must be thoroughly cleaned out before installation.

Use an acrylic nail file or sandpaper to round/bevel the inside edge of the groove. A 90% angle or sharp edge will cut the cane. Also, round/bevel the edge of the opening in the seat to prevent the cane from being cut by sharp edges.

Cane Webbing is pre-woven from the peel of the Rattan Palm, also called Natural Strand Cane. Although cane webbing is sold in many different patterns and sizes, the most common pattern is called Fine ½”. To determine how the fine ½” is calculated, measure from the center of 1 hole to the center of the hole next to it in the pattern. This is how the size is calculated for traditional octagonal patterns, with a center hole to center hole measurement. Fine ½” cane webbing can be installed horizontally or vertically because it has the same pattern in either direction. The piece of cane webbing must be larger than the opening. When measuring from spline to spline, add 2 inches to your length and width to allow 1 inch to be pushed into the groove on all sides. Do not cut the web until you are 100% sure you have enough material to cover the entire opening.

Prepare the chair before the installation of the webbing. If the chair requires gluing, stripping, painting, staining, or other types of restoration, it should be completed before installing the new piece of cane webbing and reed spline. Complete your preparations so the chair and spline can be installed simultaneously. Cane Webbing must be soaked in warm water for 3 hours and installed wet. Reed spline should be soaked in water for about 15 minutes.
Place the wet piece of cane over the opening and the groove where the spline channel is. Do not have more than 1-2 inches hanging over the groove because it will cause the webbing to pull out of the groove.

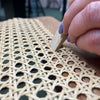
The most important point to installing the web is to make sure the holes vertical, & horizontal lines in the pattern are completely straight. Four wedges are used to install the cane into the groove. Do not hit the wedge straight into the groove. Tip the wedge to the outer edge of the groove and use it to pull the webbing into the groove.

Place the first wedge at the back of the seat and the second wedge at the front of the seat. The 3rd wedge is placed next to the first wedge, and the 4th wedge is placed next to the second wedge. Move the wedges around the perimeter of the chair. Move #1, then number 2, then 3, then 4.

Keep moving the wedges, pushing the web into the groove. The seat will end up with 2 wedges on the sides. For a difficult installation, use pieces of scrap spline to hold the webbing in place. When the webbing is thoroughly pressed into the groove, remove the wedges. Use a wedge to go around the entire groove to push the web down into the groove again.

The excess cane webbing must be removed from the outer edge of the channel before the spline is installed. Use a utility blade to carefully cut the excess webbing from the outer edge of the channel. Hold the webbing down while you are cutting. The best way to remove the excess webbing is to use a 1” chisel with a hammer to make a clean cut on the webbing around the perimeter.

Once the cane webbing is trimmed, place a thin stream of glue around the entire channel/groove. You want to use clear-drying glue. Do not use glue that dries white or acrylic glue. Acrylic glue will make the job nearly impossible if changes have to be made.

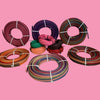
Reed Spline is made from the inner core of the Rattan Palm. It is not cane. Spline is sold in 6ft coils because most projects need about 6ft to fill the groove. We recommend one 6-foot coil per chair.

The spline must be smaller than the groove to allow for the webbing and glue. The wedge shape of the spline must be on top and facing upwards. The spline is then installed into the groove, flush with the wood top of the chair. It must not stick out above the groove/channel. The spline can be sanded smaller if needed. Soak the spline in water for 5-15 minutes to straighten the coil. This makes the reed spline more pliable and durable too.

Clamp the spline to a table and let it dry. Do not attempt to install soaking wet spline. Reed swells with water and will damage easily when installed. Dampen the spline with a wet cloth to make it more pliable to curve or bend.

When installing the spline into a regular seat, start the spline in the middle of the back and tamp it down with the 5th wedge. Never hit the spline with a hammer. For chair backs, start spline at the bottom by the seat. Use 1 piece along the bottom horizontally and miter the corners. Then use 1 piece vertically from the left corner across the top and down to the right corner. Some very ornate chairs require mitered pieces of spline along the top. That’s when two pieces of spline come together in the groove.
Overlap the 2 ends of the spline and make a clean cut through both pieces at an angle. Wipe any excess glue off the web with water. While the webbing is drying, it will shrink and tighten.

Use a pair of caning nippers or sharp scissors to flush cut any hairs, trim excess pieces of cane webbing you may have missed, or remove any splinters or spline pieces.
Basic Information
- The average spline groove is ¼” wide & ¼” deep.
- The width of the groove determines the size of the spline.
- The spline can be sanded if needed.
- Do not use a spline that is too small. It will not hold the webbing well and look unfinished in the groove.
- It is crucial to make the groove width of all 4 sides equal.
- Chair backs may have a small spline to look more delicate.
- When ordering spline, 1 coil per chair is suggested.
- The spline can be stained or painted.
For grooves that are very wide or deep:
- Sand the bottom of the wedges to make them wider.
- Soak the wedge in water to hold it in the groove.
- Fill the bottom of the channel with string or rush to take up space.
Cane Webbing is also called pressed cane, pre-woven cane, sheet cane, machine cane, mesh cane, & rattan webbing. Cane webbing can be stained, oiled, or painted after it has dried completely.
HH Perkins has a large selection of Cane Webbing styles. It comes in all different widths and patterns. Pick the right Cane Webbing style for your next project by shopping the HH Perkins catalog. Purchases of 120 inches or more are 10% off!
https://hhperkins.com/collections/cane-webbing-reed-spline
New to Cane Webbing and Furniture Restoration? No problem! Get it on the fun by purchasing one of our Cane Webbing Kits. It comes with all the materials and tools needed to complete your project.
https://hhperkins.com/collections/cane-webbing-reed-spline/products/cane-webbing-kit
Have a large project to complete? Shop our Full 50-foot Cane Webbing Roll section to save big on large quantities of material. 50-foot Rolls are currently on sale at HH Perkins!
https://hhperkins.com/collections/cane-webbing-reed-spline/products/50-foot-cane-webbing-rolls
Please Call Caryl DeFrancesco at Perkins if you have any questions at 203-787-1123, and be sure to join our email list and subscribe to our YouTube Channel for all of the latest company updates at HH Perkins, How To Videos, and tutorials.
7 comments


Please upload banner from store admin blog pages
I purchased the braided trim for an old rocker and would like to know if I should soak it in water before I apply it. It is stiff and I would think that it would be easier to place and nail that way. How long should I soak if that is the best way for the application. Thanks as always for all you help.
Thanks. Reading your instructions twice for installing reed spline will guide me do it correctly. Thanks for the tip about PVA, poly vinyl acetate (Elmer’s glue). When it dries, it cross links and is permanent. I’ll find some white paste glue.
Thank you for describing your technique for preparing strand cane. I had not come across the use of a scouring pad for preparation before. It works like a charm! Thanks again! Eloise Styer
My 2 chairs don’t have a channel to have the caning wedged into. How do I make the proper channel?
I am restoring an old child’s rocking chair and would like to use a pressed cane seat. The chair originally had metal straps in the seat opening (roughly 10″×10-3/8") so I need to create the ‘channel’ for the spline. Can I use a 1/8" router bit for the 1/8" spline or should I go to 1/4"? How deep should it be? I only have 3/8-1/2" from the hole edge to work with …. enough? Keep in mind this will not be carrying as much weight as an adult. Also, would the 14″×14″ webbing be enough or should I go to 16″×16″?